Pro Guide: Change Margin In Google Docs + Tips & Tricks!
Ever feel like your Google Docs document looks a little...off? You're not alone. Ignoring the power of margin customization is a document design crime, and it's time to reclaim control over your page's real estate.
Fortunately, mastering Google Docs margins is easier than you might think. Tailoring these settings allows you to craft documents perfectly suited to their purpose. From academic papers demanding strict formatting to sleek business proposals, personalized margins enhance the professional appeal and readability of your work. It's about more than just aesthetics; it's about effective communication.
So, how do you change the margins in Google Docs?
- Decoding Siarly What Is Siarly How To Use It
- Who Is Nicole Carter Carmellas Rise To Wwe Fame Amp More
- Open the Google Docs document you want to edit.
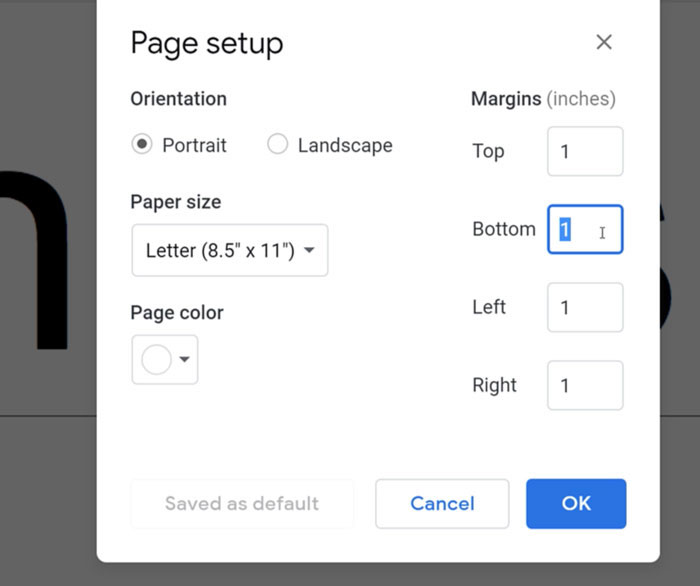
- Click on the "File" menu and select "Page setup".
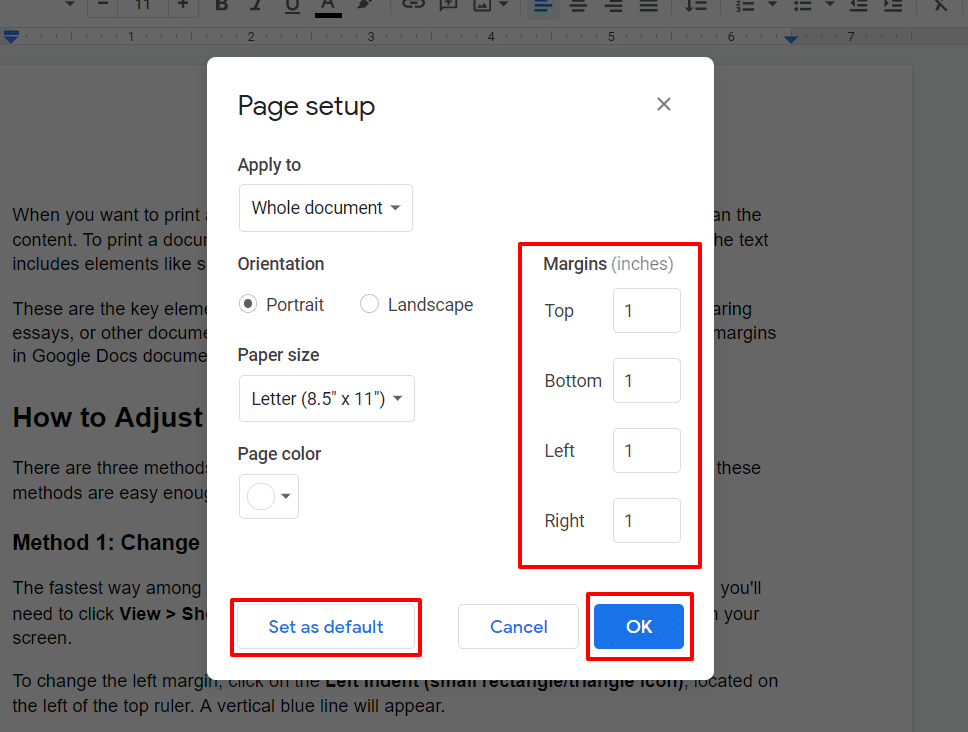
- In the "Page setup" dialog box, you can change the margins by entering new values in the "Margins" section.
- Click "OK" to save your changes.
Here are some additional tips for changing the margins in Google Docs:
- You can set different margins for different sections of your document by using the "Section breaks" feature.
- You can also use the "Ruler" to visually adjust the margins of your document.
- If you're not sure what margin settings to use, you can refer to the "Standard margin sizes" table in the "Page setup" dialog box.
Changing the margins in Google Docs is a quick and easy way to customize the look of your document. So, next time you're working on a document, don't be afraid to experiment with different margin settings to find the ones that work best for you.
Mastering the art of Google Docs margins is essential for crafting polished, professional documents. The ability to fine-tune these settings allows for precise control over the visual presentation and overall impact of your work. More than just aesthetics, it's about optimizing readability and ensuring your documents meet specific guidelines or requirements.
- Remembering Dr Jeff Young Life Legacy Rocky Mountain Vet
- Why Anniversary Jokes The Ultimate Guide Jokes
Think of margins as the breathing room for your text. They define the space between the content and the edge of the page, influencing how readers perceive your document. Too little margin, and the text feels cramped and overwhelming. Too much, and the document may appear sparse and lacking substance. Finding the right balance is key, and Google Docs provides the tools to achieve that equilibrium.
The process of adjusting margins in Google Docs is straightforward, yet the subtle nuances can dramatically affect the final product. Whether you're preparing a formal report, a creative writing piece, or a collaborative project, understanding how to manipulate margins empowers you to shape your document to its fullest potential.
Consider the context of your document. A legal document might necessitate specific margin requirements to accommodate binding and legal notations. A marketing brochure might benefit from wider margins to create a sense of space and highlight key visuals. A research paper might adhere to a uniform margin standard to comply with academic guidelines.
Experimentation is also crucial. Don't be afraid to try different margin settings to see what works best for your particular document. The "Page setup" dialog box in Google Docs offers a user-friendly interface for adjusting top, bottom, left, and right margins, allowing for customized layouts that enhance readability and visual appeal.
While the manual adjustment of margins is a powerful tool, it's equally important to understand how Google Docs' features like section breaks can further enhance margin control. Section breaks allow you to create distinct sections within a document, each with its own unique margin settings. This is particularly useful for documents with varying content types or specific formatting requirements for different sections.
For instance, you could use section breaks to create a title page with wider margins, followed by a body section with narrower margins for optimal text density. Or, you might incorporate landscape-oriented pages within a primarily portrait document, each requiring different margin settings to accommodate the wider format.
Beyond the basic margin adjustments, Google Docs also provides visual aids, such as the ruler, for precise control over page layout. The ruler allows you to drag and drop margin boundaries, providing an intuitive way to visualize and fine-tune the space around your text. This feature is particularly helpful for creating visually balanced documents with consistent margins throughout.
In addition to the ruler, the "Page setup" dialog box also offers a "Standard margin sizes" table, providing quick access to commonly used margin settings. This is a convenient starting point for those unfamiliar with typical margin standards or seeking a quick way to apply pre-defined settings.
Ultimately, mastering Google Docs margins is about understanding the principles of document design and applying them strategically to your work. By taking the time to learn these techniques, you can transform ordinary documents into visually compelling and professionally crafted pieces that effectively communicate your message and leave a lasting impression.
Remember, the key to success lies in experimentation and a keen eye for detail. Don't be afraid to explore the various margin settings and features offered by Google Docs until you find the perfect combination that suits your specific needs and enhances the overall quality of your documents.
Here's a sample table you can use in your WordPress post about changing margins in Google Docs. Since our topic isn't directly person-related, this table will offer helpful related resources.
| Resource Type | Description | Link |
|---|---|---|
| Google Docs Help Article | Official Google Docs documentation on page setup and margins. | Google Docs Help |
| Blog Post | Detailed guide with screenshots on adjusting margins, section breaks, and page orientation. | GroovyPost - Google Docs Margins |
| Video Tutorial | Short video demonstrating how to change margins and page size in Google Docs. | YouTube - Google Docs Margins Tutorial |
| Academic Writing Guide | Guidelines on standard margin sizes for academic papers. | Purdue OWL - Formatting |
| Legal Document Formatting | Examples of margin requirements for legal documents. | Cornell Law School |
Changing the margins in Google Docs is an essential skill for creating professional-looking documents. Here are seven key aspects to consider:
- Top margin: Controls the space from the top of the page to the first line of text.
- Bottom margin: Controls the space from the last line of text to the bottom of the page.
- Left margin: Controls the space from the left edge of the page to the text.
- Right margin: Controls the space from the right edge of the page to the text.
- Page orientation: Determines whether the page is in portrait or landscape mode.
- Page size: Specifies the physical size of the page, such as letter or A4.
- Section breaks: Allow you to set different margins for different sections of your document.
These aspects are all interconnected and work together to create the overall layout of your document. For example, increasing the top margin will move the text down the page, while decreasing the left margin will make the text wider. Experimenting with different margin settings can help you create a document that is both visually appealing and easy to read.
The top margin is an often-overlooked element, yet it holds significant power in shaping the overall aesthetic and readability of a document. Adjusting this space strategically can elevate your document from ordinary to extraordinary. Whether aiming for a spacious, elegant feel or a compact, efficient layout, understanding the nuances of the top margin is crucial.
- Visual appeal: The top margin can be used to create a visually appealing document. For example, a larger top margin can make a document look more spacious and elegant, while a smaller top margin can make a document look more compact and efficient.
- Readability: The top margin can also affect the readability of a document. A large top margin can make it easier to read a document, as it provides more space between the text and the edge of the page. A small top margin, on the other hand, can make it more difficult to read a document, as the text may be too close to the edge of the page.
- Consistency: The top margin should be consistent throughout a document. This means that all pages in the document should have the same top margin. In Google Docs, you can use the "Apply to all" button in the "Page setup" dialog box to ensure that the same top margin is applied to all pages in your document.
By understanding the role of the top margin and how to change it in Google Docs, you can create documents that are both visually appealing and easy to read.
The bottom margin, like its counterpart at the top, plays a critical role in defining the overall look and feel of a document. Its influence extends beyond mere aesthetics, impacting readability and the document's perceived sense of completion.
A carefully chosen bottom margin provides a visual anchor, grounding the text and preventing it from feeling adrift on the page. Conversely, a poorly considered bottom margin can leave a document feeling unfinished or visually unbalanced.
The bottom margin can be used to create a visually appealing document. For example, a larger bottom margin can make a document look more spacious and elegant, while a smaller bottom margin can make a document look more compact and efficient.
The bottom margin can also affect the readability of a document. A large bottom margin can make it easier to read a document, as it provides more space between the text and the edge of the page. A small bottom margin, on the other hand, can make it more difficult to read a document, as the text may be too close to the edge of the page.
The bottom margin should be consistent throughout a document. This means that all pages in the document should have the same bottom margin. In Google Docs, you can use the "Apply to all" button in the "Page setup" dialog box to ensure that the same bottom margin is applied to all pages in your document.
By understanding the role of the bottom margin and how to change it in Google Docs, you can create documents that are both visually appealing and easy to read.
The left margin, often viewed as a purely functional element, wields surprising influence over a document's overall aesthetic and reading experience. Beyond its role in providing visual separation between the text and the edge of the page, the left margin contributes to the document's perceived structure and balance.
A well-defined left margin provides a clear visual starting point for each line of text, guiding the reader's eye and improving comprehension. Conversely, an inadequate or inconsistent left margin can lead to a cluttered and visually overwhelming reading experience.
The left margin can be used to create a visually appealing document. For example, a larger left margin can make a document look more spacious and elegant, while a smaller left margin can make a document look more compact and efficient.
The left margin can also affect the readability of a document. A large left margin can make it easier to read a document, as it provides more space between the text and the edge of the page. A small left margin, on the other hand, can make it more difficult to read a document, as the text may be too close to the edge of the page.
The left margin should be consistent throughout a document. This means that all pages in the document should have the same left margin. In Google Docs, you can use the "Apply to all" button in the "Page setup" dialog box to ensure that the same left margin is applied to all pages in your document.
By understanding the role of the left margin and how to change it in Google Docs, you can create documents that are both visually appealing and easy to read.
The right margin, often considered the unsung hero of document formatting, plays a subtle yet crucial role in shaping the overall reading experience and visual appeal of a document. While its impact may not be as immediately apparent as the top or left margins, the right margin contributes significantly to the document's perceived balance and readability.
- Visual appeal: The right margin can be used to create a visually appealing document. For example, a larger right margin can make a document look more spacious and elegant, while a smaller right margin can make a document look more compact and efficient.
- Readability: The right margin can also affect the readability of a document. A large right margin can make it easier to read a document, as it provides more space between the text and the edge of the page. A small right margin, on the other hand, can make it more difficult to read a document, as the text may be too close to the edge of the page.
- Consistency: The right margin should be consistent throughout a document. This means that all pages in the document should have the same right margin. In Google Docs, you can use the "Apply to all" button in the "Page setup" dialog box to ensure that the same right margin is applied to all pages in your document.
By understanding the role of the right margin and how to change it in Google Docs, you can create documents that are both visually appealing and easy to read.
Page orientation is more than just a setting; it's a fundamental design choice that dictates how your content is presented and perceived. In Google Docs, the decision between portrait and landscape orientation can dramatically impact the visual impact and effectiveness of your document. Understanding the nuances of each orientation empowers you to create documents that are both visually appealing and functionally optimized for their intended purpose.
- Portrait orientation: Portrait orientation is the default orientation for most documents. It is taller than it is wide, and it is typically used for documents that are meant to be read on a computer screen or printed on a standard sheet of paper.
- Landscape orientation: Landscape orientation is wider than it is tall, and it is typically used for documents that are meant to be printed on a large sheet of paper or viewed on a wide screen. Landscape orientation can be useful for documents that contain wide tables or images.
When choosing a page orientation for your document, it is important to consider the purpose of the document and the audience who will be reading it. For example, if you are creating a document that will be printed on a standard sheet of paper and mailed to clients, you will likely want to use portrait orientation. However, if you are creating a document that will be viewed on a wide screen, such as a presentation or a poster, you may want to use landscape orientation.
You can change the page orientation of your document in Google Docs by following these steps:
- Open the document you want to edit.
- Click on the "File" menu and select "Page setup".
- In the "Page setup" dialog box, select the desired page orientation from the "Orientation" drop-down menu.
- Click "OK" to save your changes.
By understanding the different page orientations available in Google Docs, you can choose the orientation that is best suited for your document and its intended audience.
Page size, often taken for granted, forms the foundation upon which your document is built. In Google Docs, the choice of page size is not merely a technical detail; it's a fundamental design decision that impacts readability, visual appeal, and the overall effectiveness of your content. The interplay between page size and margin settings is particularly crucial, requiring careful consideration to achieve a harmonious balance.
- Standard page sizes: Google Docs supports a variety of standard page sizes, including letter (8.5 x 11 inches), A4 (210 x 297 millimeters), and legal (8.5 x 14 inches). These page sizes are commonly used for documents that will be printed or shared electronically.
- Custom page sizes: In addition to standard page sizes, Google Docs also allows you to create custom page sizes. This can be useful for creating documents that have unique dimensions or that need to be printed on special paper sizes.
- Margin settings: The margins in Google Docs are measured in inches or centimeters. You can set different margins for the top, bottom, left, and right sides of the page. The margins can be adjusted to create a variety of effects, such as making the document look more spacious or formal.
By understanding the relationship between page size and margin settings, you can create documents that are both aesthetically pleasing and functional.
Section breaks represent a powerful, yet often underutilized, tool within Google Docs. They provide a means to transcend the limitations of uniform document formatting, enabling the creation of complex layouts with distinct sections, each tailored to specific content requirements. By mastering the art of section breaks, you can unlock a new level of control over your document's visual presentation and overall impact.
- Use case: Creating a document with different page orientations
Section breaks can be used to create documents that have different page orientations. For example, you could create a document that has a portrait orientation for the first few pages and a landscape orientation for the remaining pages.
- Use case: Creating a document with different margin settings
Section breaks can also be used to create documents with different margin settings. For example, you could create a document with wide margins for the first page and narrow margins for the remaining pages.
- Use case: Creating a document with different headers and footers
Section breaks can also be used to create documents with different headers and footers. For example, you could create a document with a different header for the first page and a different footer for the remaining pages.
By understanding how to use section breaks, you can create complex and professional-looking documents in Google Docs. Here are the steps on how to insert a section break:
- Click on the "Insert" menu.
- Select "Break".
- Choose the type of section break you want to insert.
This section addresses frequently asked questions (FAQs) related to changing margins in Google Docs. It provides clear and concise answers to common concerns or misconceptions, helping users gain a deeper understanding of the process.
Question 1: Why is it important to change margins in Google Docs?
Answer: Changing margins allows you to customize the layout of your document, making it more visually appealing, readable, and suitable for various purposes. Proper margins enhance the overall presentation and readability of your content.
Question 2: Can I set different margins for different pages in my document?
Answer: Yes, you can use section breaks to divide your document into multiple sections, each with its own unique margin settings. This feature provides flexibility in creating complex layouts and accommodating specific requirements.
Question 3: What should I consider when setting margins?
Answer: When setting margins, consider factors such as document purpose, intended audience, readability, and any specific requirements or guidelines. Standard margin sizes are often recommended, but you may need to adjust them based on your needs.
Question 4: How do I ensure consistent margins throughout my document?
Answer: To maintain consistency in margins, select the "Apply to all" option in the "Page setup" dialog box. This ensures that the same margin settings are applied to all pages in your document.
Question 5: Can I change margins after inserting content into my document?
Answer: Yes, you can modify margins at any point during the editing process. Simply adjust the margin settings in the "Page setup" dialog box, and the changes will be applied to your existing content.
By understanding these FAQs, users can effectively utilize the margin settings in Google Docs to enhance the presentation and readability of their documents.
Key Takeaways:
- Changing margins is crucial for customizing document layout.
- Section breaks allow for different margins in various sections of a document.
- Consider document purpose and readability when setting margins.
- Use "Apply to all" for consistent margins.
- Margins can be adjusted after content insertion.
Transition to the Next Section:
The next section will explore advanced margin settings and techniques in Google Docs, enabling users to further enhance their document formatting skills.
- Discover Luna Silver Properties Uses And Value Explored
- Alert What You Need To Know About The Whitney Wisconsin Leak
![How to Change All Margins in Google Docs [FAQ]](https://lh6.googleusercontent.com/ExTZ3MQn28pfm1e4KgZFKyi4Iq62DPkDLL7F5ys8V4ClU7ssuQGnodKSXA_CYRBJHYRQpLYYk8M3xXzA9VtFnxsEVmOk2KVjwzK2QcIiEp2SI6mD8nAPW_j21cb9j5OJZJqu7ok7)
How to Change All Margins in Google Docs [FAQ]
Google Docs Adjusting Margins
How to set different margins on different pages in docs nutper
